GI Endoscopy · 8 min read
Top Tips on Clips for Hemostasis

MEMBER ARTICLE
The main types of endoscopy clips are categorized as clips placed through the working channel of the endoscope, or through-the-scope clips (TTSCs), and clips placed on top of the endoscope, called over-the-scope...
[membership level="0"]Continue with EndoCollab membership.
Get the full article plus the complete EndoCollab library of courses, cases, classifications, and practical teaching resources.
The main types of endoscopy clips are categorized as clips placed through the working channel of the endoscope, or through-the-scope clips (TTSCs), and clips placed on top of the endoscope, called over-the-scope clips (OTSCs). Most, if not all, hemostatic clips available in the market now are made of nonferromagnetic materials (eg, nitinol, tantalum, and titanium), which have the advantage that they are not heated or attracted by magnetic resonance imaging or magnetic resonance tomography (MRT). This is a common concern of clinicians and patients because clips, once they are placed, tend to stay attached for a couple of days, sometimes weeks, and in some cases, up to years. In general, they are safe, and there are no reports of clips causing damage during MRT
The mechanism of action is compression to facilitate apposition of tissue using the clip’s 2 arms, sometimes called hands, which are attached to a stem. The arms and stem, the main anatomical aspects of TTSCs, form the shape of a Y (Figure 1).
Figure 1. Through the scope clips (TTS). The clips have stem (arm) and “hands”. When open, the shape is like a “Y”.
The tips of the arms may be curved or have little hooks or are angled about 45 degrees to allow for catchment of tissue. Some newer clips have very wide arms (eg, the MANTIS clip, Boston Scientific, USA), which can close larger defects, such as perforations or leaks. Most clips have a stem of about 8 to 9 mm, which generally works well; however, for some areas, such as inside the esophagus, large stems can rub the opposing esophageal wall. Therefore, the choice of clip needs to be based on the anatomic area where one is working. In the esophagus, I use clips with short stems. When closing a large defect, I use clips with long arms or several clips with shorter arms.
The OTSC is different in that it looks like a bear trap that is delivered through a cap placed on top of the scope (Figure 2A).

Figure 2A. Over-the-scope clip (OTSC).
There are 2 types of OTSCs, one from Ovesco, the most commonly used clip worldwide, and another from STERIS. The Ovesco clip comes in various shapes and sizes. The bear trap design allows for a higher catchment area, has greater opposition forces, and often, especially in bleeding ulcers or lesions who have a visible vessel, can be the only therapy. It is used as a one-and-done monotherapy, which is a new trend. For me, it has been a revolution in therapeutic endoscopy and one of the major inventions in the last 15 years (Figure 2B)

Figure 2B. Hemostasis using Ovesco Clip, effective single therapy (monotherapy).
Question: Do you have a strategy for clip selection? How do you choose the right clip for the right job?
KM As discussed, for the esophagus, especially the upper esophagus, close to the upper esophageal sphincter, I prefer to use clips with a shorter stem. For a large lesion, the MANTIS clip works well because it can be expanded more than other clips. When I anticipate using 2 clips to close a defect, perforation, or postresection area (eg, after a right colonic resection), I like to use an Instinct clip (Cook Medical, USA) because of its very high strength forces. Such a clip is useful in situations where a clip may come loose or where the clip needs to be really tight. In the United States at Carilion Roanoke Memorial Hospital, we have 3 types of clips; however, other hospitals may not have multiple clip options. For endoscopists who have access to only one clip and are working on a defect that would likely be better closed with a broader clip, then my advice is to focus on the defect but not close to where the area is most wide, rather start at the edge and approximate, so that the closure area becomes smaller, and use the width of the arms expanded by the clips in the best possible way (Figure 3). Otherwise, the user might end up losing the clip, which can happen if one tries to hook on one side and then twist and hook the other side. My approach is to go from one edge and just make the wound smaller and that results in a safer and efficient closure.

Figure 3. Top tips to close mucosal defects and perforations.
Question: Could you share some technical tips and tricks for effective clip deployment and how to avoid misfires and premature release?
KM Lesions in the duodenum area, especially in the posterior duodenum where bleeding gastroduodenal artery ulcers are often found, can be very difficult to close with TTSCs. For this situation, I generally tend to use the OTSC because I can move the endoscope to various parts of the endoluminal GI tract and position the cap where the clip is attached to face the direction of the perforation, ulcer, or lesion I want to engulf. For upper GI bleeding, the OTSC has been my major clip, even as first-line, not just as rescue, therapy because it is quick and efficient.
Those who may not have OTSCs or mainly use TTSCs can try the following trick to close or approach an ulcer in the posterior duodenum. Because the working channel of the endoscope is generally on the left, try switching to a pediatric colonoscope that has a working channel on the right. Having the working channel on the right will allow placement of the TTSC into the posterior duodenum.
Another very important tip I teach my fellows is what to do when they have the endoscope in a perfect position in the second duodenum, or sometimes at the curve of the bulb and second duodenum, and are about to advance a TTSC, but the clip does not release because it is twisted from angulation. There are clips from STERIS that can go out of the endoscope in a retroflexion or angulated position, which is a good clip to have in any unit. However, for those who do not have such a clip or are using a traditional clip, my trick is to place a distant transparent cap on the endoscope. This cap is generally used for ESD, but we use it for many different procedures, especially for placing clips (Figure 4). Having this cap in the emergency cart is essential. (It is different from the caps used for removal of foreign bodies that tend to be larger.) After the cap is attached to the endoscope, enter the stomach, once in the antrum, deploy the clip. Once the clip is opened, keep it open, the assistant should not close it, pull the clip with your right hand into the tip of the cap, which will automatically semi-close the clip. Now, there is no problem proceeding to the lesion because the clip is no longer twisted and ready to be fired inside the cap.

Figure 4. Cap-clip hemostasis.
The beauty is that this cap works the same as an OTSC. Once in the lesion, the endoscopist just needs to push the clip a little bit. At that moment, the assistant closes the clip. This is a quick and effective procedure for situations that can appear desperate. Thinking outside the box led to using the cap, and now we keep the cap inside the toolbox.
Question: What are your best practices for clip placement and optimal positioning?
KM For actively bleeding lesions, when it is clear that the TTS clip will not stay on top of the lesion because the intestine is moving or either the patient or the clip is not in an ideal position, try to place the clip a little distal of the lesion (Figure 5). This is done for 2 reasons: (1) for the radiologist, by placing the TTS clip, even if the endoscopist is not able to get the bleeding lesion, at least the radiologist can see it during the interventional angiography; and (2) for direction, clipping a little distally to the lesion creates a little bump that can facilitate placement of the next clip in a better position to target the bleeding lesion. This helps to avoid missing the lesion.

Figure 5. Bump trick for hemostasis.
Question: How do you approach challenging locations?
KM For challenging locations such as a tortuous colon or positions where the endoscopist cannot push the clip through the endoscope such as in retroflexion, and there is GI bleeding from the cardia, either have some clips with a thinner diameter shaft (eg, the ones from STERIS or Micro-Tech) that can be advanced in a retroflexion position or change to an endoscope with a larger working channel. When working in the cardia, having a therapeutic gastroscope with a 3.2, 3.4, or 3.8 mm working channel would be helpful. Those who lack the training or experience with these endoscopes can advance the clip into a standard endoscope with 2.8 mm channel until it is almost at the tip, then during endoscopy when at the area that needs clipping, pushing the clip the final 2 or 3 cm out of the endoscope is easy because the clip is already inside.
Another trick to try in the colon, but also especially during anterior or retrograde deep enteroscopy, is to utilize the overtube. Leave the overtube in place and bring the endoscope out, load the clip into the endoscope and then go through the overtube, which is now like a giant working channel communicating the outside world through the mouth or through the anus to the area of interest, perhaps the cecum or excluded stomach. Going through the overtube with the clip loaded on the endoscope makes traveling through challenging locations much easier (Figure 6).
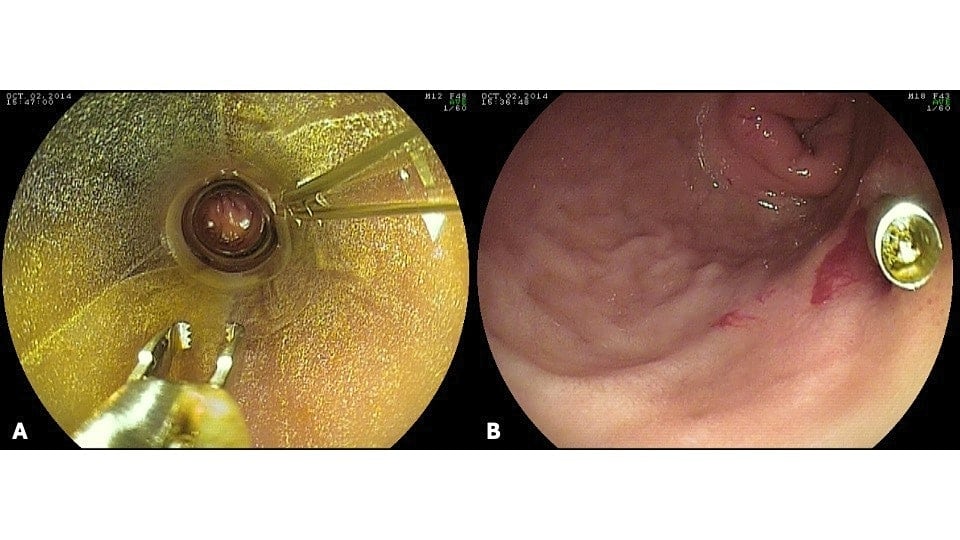
Figure 6. Clip placed through overtube to treat bleeding duodenal ulcer in patient with Roux-en Y gastric bypass.
Source/reference: K. Mönkemüller. Gastroenterology and Hepatology, July 2025
[/membership]
For your teaching file
Save this article as a PDF
Drop your email and we'll open a print-ready version you can save as a PDF — and you'll start getting our weekly GI endoscopy newsletter.